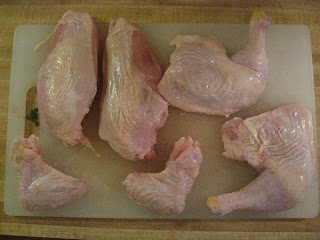
I like to start with a whole chicken, remove the meat and save for cooking during the week, and use the carcass and internal organs for making the stock. This post will cover how to debone your chicken.
Step 1: Get to know your chicken
- Take your chicken out of the plastic and look inside the opening and pull out any internal organs or the neck that are usually sold with the chicken. Orient your chicken so that you could shake its "hand" and then lay it back on its back. Now your chicken is ready to start cutting.
Step 2: Remove the legs
- You are going to cut the legs off first. Start by slicing the skin right where the leg meets the body of the chicken. A shallow cut here should expose the hip joint.
- Complete the cut by continuing to cut up towards the wings, continuing to expose the hip joint. Then turn your chicken over. Continue your cut up around the top of the hip. You should use the tip portion of your knife and feel your way. Don't cut through any ribs or any bones at this point. There is a tender meaty portion on the back of the chicken known as "the oyster." Make sure you get this in the leg piece you are cutting off. In the picture below you can see that I've just cut around the oyster.
- Continue your cut down, getting all of the thigh meat. Turn your chicken back over on his back. At this point the leg should be mostly cut off, with just the bone holding it together. Pull the leg back towards the back of the chicken, fully exposing the joint. You may hear a pop as the hip dislocates. Find the space between the two bones with the tip of your knife. It should be easy to cut through this joint. Now your leg is free.
- Repeat on the other side.
Step 3: Remove the wings
- Next you are going to remove the wings. First, find the very last joint on your chicken's wing. Place the part of your knife closest to the handle on this joint and then firmly push down with the heel of your left hand. The tip of the wing should cut off very easily. This part of the wing has very very little meat and is best used in your stock. Reserve these bits.
- Now bend your chicken's wing back to find the shoulder joint. When you've found it, cut through the joint, removing the wing.
Step 4: Remove the breasts
- To remove the breasts, start by laying your now legless and wingless chicken on its back. Find the point of the breastbone and make a shallow slice on top of it, making sure not to cut into the bone.
- Next cut off one of the breasts by following the rib cage down, making small slices as you go and pulling the breast meat away as you go. This will help you get all of the meat on the breast and not on your carcass.
- Repeat on the other side.
Step 5: Finishing
- Now that you have deboned your chicken, make sure to set aside the carcass, wing tips, and inner organs + neck for your stock.
- You should have two legs, wings, and breasts for cooking. I like to store my chicken pieces in a plastic bag (like the type you get in the produce department) and then inside a large Tupperware container in the fridge for use during the week.
I like to debone my chicken(s) and get the stock going first thing Saturday or Sunday morning. This way you'll have chicken pieces and fresh stock for the week, plus your house will smell delicious all weekend.
If you've never deboned your own chicken and made stock from scratch, I totally understand that it can be very intimidating at first. But rest assured, after you've cut up a few chickens, you'll be able to do this in under 5 minutes easily; you will have fresh home-made stock to use, which is worlds better than the store-bought stuff; and you will save money as whole chickens are cheaper than chicken parts and stock. It is definitely worth the effort (which is minimal)!


This makes me so happy!
ReplyDelete