Wednesday, January 26, 2011

Left-Overs - Part 2: Chicken Curry Salad

With the other half of my left-overs from the weekend (balsamic-marniated chicken breast) and various vegetables and other items I had in the pantry, I made a very quick chicken curry salad:


Ingredients:
- Cooked chicken breast, cut into 1cm cubes
- 1/2 cucumber, brunoised
- 1 large carrot, brunoised
- Handful green beans, cut on the diagonal into small pieces
- 1/4c slivered almonds
- Packet of pre-cooked barley and spices (similar to this)
- 2oz part-skim low-fat mozzarella cheese
- 1/4c plain yogurt
- 1T curry powder
- 1T lime juice
- 1t honey
- Salt and pepper to taste

Toss the first 7 ingredients together in a bowl.  Mix the yogurt, curry powder, lime juice, honey, and slat and pepper together in a small bowl and then dress the chicken salad. 

By using the leftovers and the pre-cooked barley/whole grain rice mix, you can really put this lunch together in a matter of minutes in the morning!
-

Tuesday, January 25, 2011

Left-Overs - Part 1: Pasta with Chicken and Balsamic Mustard Sauce

Over the weekend I made chicken paninis for Cillian and his running buddy, Tom.  I had bought four chicken breasts, and threw them all in the marinade of balsamic vinegar, water, chicken spice seasoning, and mustard seeds.  I cooked three of the four breasts for our sandwiches, and left one lonely breast in the marinade.  I also had some left-over cooked spagheti (dressed only with a little butter and parmesan), so here is what I made for lunch:


Ingredients:
- 1 chicken breast, marinated in balsamic, water, chicken spice seasoning, and mustard seeds
- Canola oil
- 2T shallots, finely minced
- 1/2c wine
- 1/2 - 1c chicken stock
- 1T mustard
- 1t mustard seeds
- Salt and pepper as needed
- Cooked noodles

Heat your oil in your pan.  Add the chicken breast and saute until cooked.  (You could cut your breast into bite-sized pieces before cooking, but I wanted to let it cook longer and really have the balsamic marinade get carmelized and dark, dark brown, so I left the breast whole and cut it up after it was cooked.)

Remove the cooked chicken, deglaze with wine, add shallots and cook until almost all of the liquid has evaporated.  Add the chicken stock and mustard seeds and reduce until sauce consistency.  Add mustard, salt, and pepper.

Toss noodles, chicken, and sauce.  Voila, lunch in 20 minutes (also great reheated)!

Quilt for Baby Sprout

Here is the finished quilt that I offered a sneak-peak of last week.  It is for my good friend Kristen's baby on the way... "Baby Sprout" for now. 


Monday, January 24, 2011

Kitchen Renovation - Before and After

Our kitchen renovation is complete, except for a few finishing touches.  The contractors will come back for one more day to install the last cabinets (which had to be reordered because the space was slightly too tight for what we had ordered), finish the backsplash around those cabinets, put on the hardware, and finish some touch-up painting.  We were able to move back into the kitchen and I even cooked a full meal this weekend! 


And here is a good picture of the amazing change in our floors!


So much better!  We're still trying to figure out why anyone would cover these beautiful wood floors with faux-brick linoleum!

Thursday, January 20, 2011

Kitchen Renovation - Day 13

The most impressive progress today was in the bathroom.  The toilet was supposed to be installed today, but we learned that our old toilet has a crack in it and so instead of re-installing it, we are going to buy a new one.  Brandon found a good deal on one, so hopefully the bathroom will be fully up and running after one more day!


There is also a little bit of baseboard that still has to be added on the wall with the sink.  The crew is also going to make us a radiator cover for the small radiator in the corner.  This was the only radiator in the whole house that didn't have a cover.  We researched various options on how to make our own radiator cover or how much it would cost to have someone make one for us.  We were surprised to learn how expensive they can be.  So we're thrilled that the guys offered to make one for us as part of our contract.  They are going to use a left-over piece of granite from the kitchen countertop for the top, so it will function like an extra shelf in the bathroom. 


After having trouble fitting the kitchen pendant light in, I was a bit worried about my selection for the bathroom, but I think it works great!

Wednesday, January 19, 2011

Kitchen Renovation - Day 12

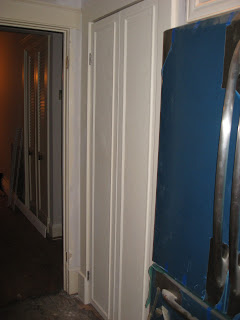
My new pantry is in!

Brandon and his crew made these custom doors to mimic the pattern of our cabinets.  They selected the trim pieces and tacked them on to flat-pannel doors to add some detail.  They also custom-made the trim around the pantry doors, which looks almost exactly like the old trim around all the rest of our doors.  I'm so thrilled.... wait until you see what is going inside the pantry!


We were left with a little bit of space above the pantry that was not going to be very accessible from inside, so we decided to make it open to the outside.  This was originally conceived of as a shelf for cookbooks, but I think it's a bit high to reach and it may be the perfect space for some much-needed wine storage!

Tuesday, January 18, 2011

Taylor's Refresher

We spent this past weekend in Napa Valley, tasting wine and eating good food.  One of the best meals we had was a pair of late-afternoon burgers at Taylor's Refresher, right on Highway 29, the main road that runs through the Valley. 

The place is just a classic walk-up counter stand, with a good selection of various burgers and other sandwiches topped with all kinds of great additions.  Cillian's was some kind of mushroom cheeseburger, but I'm pretty sure he picked it because it was served up on sourdough toast.

Mine was one of those low-cal burgers with an enormous onion ring, bacon, blue cheese, barbeque sauce, and pickles. It was amazing.


For two wine-weary travelers, this was a great rejuvinator pit-stop.  

\

Kitchen Renovation - Day 11

After being away all weekend, we came home to a great surprise - - our backsplash and countertops are done!  We selected a 1x2" alabaster marble subway tile for the backsplash, with snow white non-sanded grout.  I think it looks great - very clean and polished.  And it really ties everything together.


Here you can see the finished countertop on the fridge-side.  We opted for an overhang past the last cabinet so that there is a place for Cillian to sit while I'm cooking.  We couldn't fit another cabinet in that spot, but also wanted to maximize whatever counter space we could.  I think it turned out really well.


Our sink and faucet are also now fully installed and working.  We went with a D-Shaped sink, which is definitely big enough to wash pots and pans, but doesn't take up as much valuable counter space as a double welled sink.  I think it was a good choice - - yet another recommendation of Brandon that turned out so well.


And finally, our bathroom renovation is really getting underway!  Mike laid all of the tile.  I think it looks great.  Very clean and classic looking.  The white octogons are also made out of the white alabaster marble that our backsplash is made from.  We're really moving now!


Saturday, January 15, 2011

Bathroom Renovation - Color Pallete

Alongside our kitchen renovation, we are also completely renovating our powder room, just off the back of the kitchen.  In all of the kitchen hubub, this has nearly been forgotten!  The powder room is small, but has very high ceilings like the rest of our house, and a window out onto the screened-in porch (which will be appropriately covered with a window treatment).  For the floors we have picked out a very traditional tile, like this:


It is made out of alabaster marble and black marble.  We bought a porceline pedestal sink, and are re-using the porceline toilet.  Our contractors are going to make a radiator cover for the small bathroom radiator, and use a left-over piece of our granite countertops for the top of the radiator cover.  This way it can double as a shelf.

Here is what we are thinking of for the color pallete:


We are thinking of using the second-darkest blue - "Gentleman's Grey" - on that color wheel.  (I only had a sample of the tile in the basketweave pattern, but it is the same material, so you can see what the colors will be.)  The tile and color wheel are sitting on top of our kitchen counter.

What do you think?


Friday, January 14, 2011

What am I Working On? . . . It's a Surprise!


Here is a sneak-peak.  This is a gift for a friend, so I don't want to reveal it yet... more next weekend.

Thursday, January 13, 2011

Kitchen Renovation - Day 8

It's starting to look like a real kitchen!  Our appliances are in and hooked up.  You can see the dishwasher, range, and convection microwave here.  We haven't tested anything out yet, but we're excited to give them a whirl soon!  We're just waiting on one more cabinet that will go to the right of the range on the bottom and to the right of the microwave on the top.  You can just see where the wall juts out a few inches, which apparently is part of the structural support for our stairs.  So we had to shrink those cabinets a little from what was in thh plans.


And here is the refrigerator.  Our contractors had hooked it up in the living room for us to use during the renovation, and it's actually taking a little effort to get used to it being in the kitchen!

Kitchen Renovation - Day 7

Sorry I am a little behind in getting this post up!  The first piece of granite was installed on Tuesday!  It looks fabulous.  We are so pleased with how everything is coming together.


Cillian is particularly overjoyed :)


Tuesday, January 11, 2011

Kitchen Renovation - Day 6

The real progress today was that the granite for our countertops arrived!  We ended up choosing a piece of absolute black granite that has a very light leathered finish.  We were originally thinking that we wanted a honed piece, but this leathered granite pretty much fell into our laps after the deft negotiating of our contractor.  We got it for a totally reasonable price, and it is goregeous!
I really don't know how they got it out of the van and into our backyard, but here it is - being cut and finished!


Here is a close-up of the stone:

Kitchen Renovation - Day 5

All of the cabinets are in place!


The under-cabinet lights are installed.  All of the electrical outlets and light switches are installed under the cabinets as well, so that the backsplash will be one continunous run of tiles.


  I didn't get a good picture of it, but they also installed lighting above the cabinets so the space between the cabinets and the ceiling is softly lit as well.

Friday, January 7, 2011

Kitchen Renovation - Day 4

The upper cabinets are hung! 


We are thrilled with the way the cabinets look so far.  We had been slighly concerned that the cream color would be too creamy, but it works perfectly.  It looks clean and bright, not old and dingy like the old cabinets! 


On this side you can see the opening for the refrigerator and the upper cabinets that are going to have glass-front doors, on the right side.  Amazing progress again!

Thursday, January 6, 2011

Kitchen Renovation - Day 3

Everything is still going according to plan in our kitchen.  Each morning we have a meeting with the contractor and his team to go over the plans for the day.  This morning we made some additional design choices on the layout of the upper cabinets.  Here are Brandon's hand-drawn plans - right on our wall - that we decided to go with.


Most of the work today was behind the scenes (wiring, plumbing, gas lines, etc.), but they did get the pantry sheet-rocked, and also added sheetrock to some areas where the plaster had cracked and fallen off of the walls.


Assuming that everything goes well, the upper cabinets should be hung by the time I post next!


Wednesday, January 5, 2011

Free-Motion Quilting

So I thought I would try my hand a free motion quilting for the Irish Garden quilt I am working on.  This is the pattern I selected for half of the squares (the other pattern is also four hearts, but the pointed ends are facing out instead of into the center).  Granted this was an early attempt, but I'm not sure my skills are quite up to snuff!

Any hints about how to make it smoother?

Kitchen Renovation - Day 2

When I arrived home last night, our new ceiling, complete with recessed can lights was finished!  The ceiling was constructed by nailing a "ledge" around the walls and then hanging the drywall from that.  We decided to install this new ceiling because the original plaster ceiling had cracked from the house settling, and probably would continue to crack over time.  This ceiling should be more resistant to cracking than the old plaster ceiling.


The guys also framed out our new pantry.  We were originally going to keep the old pantry, but they wanted to remake it because the old one was in bad shape.  You can see that there is a gap between the 2x4 and the wall - it is actually flush with the wall at the floor, but the walls are so out of square that there is about an inch gap at the top.  This pantry is probably the only thing that is level and square in our whole house right now!


And finally, just a picture to show the wood floors in the entryway with all of the parquet removed. 

Tuesday, January 4, 2011

Kitchen Renovation - Day 1

The first day of our kitchen/bathroom/entryway renovation is over and we are very impressed with the progress.  The entire kitchen has been stripped and hauled away (except for the refrigerator, which we will donate to Habitat for Humanity).  It's amazing how big the kitchen looks with everything removed!  We were worried that there would be pipes, wires, etc. behind the soffets above our cabinets, but luckily they were just for show and the original plaster walls were the only thing back there.


The other great surprise was that when they pulled up the old parquet floors in our entryway, there was beautiful white oak hardwood underneath!  It is in perfect condition, except for a few nail holes from where the parquet subfloor was nailed.  These wood floors run all the way through the kitchen to the back of the house, so we will now have the original hardwood throughout.  Often in older houses the more expensive wood was used only for floors in the living room and dining room areas, with cheaper pine in the kitchen and bedrooms.  Luckily for us, our house was built with the nicer white oak throughout. 


I think George was the only one not excited by the first day's progress.  He's not too happy about the strange men tearing apart his house.  Our lovely neighbors are going to take him today, so he'll be able to nap in peace!


Monday, January 3, 2011

Kitchen Renovations!


No, we weren't robbed of all of our food and dishes this weekend, our kitchen renovation started today!  In preparation, we totally moved out of the kitchen over the weekend.  Most of the pots, pans, serving dishes, etc. went into storage in the basement, but I also created a small temporary pantry in the dining room that I think has everything we'll need to get by for the next few weeks until we can move into our brand new kitchen!


This will be quite the experiment.  I've set aside a set of nesting bowls, a strainer, a couple of serving dishes, select serving and cooking utensils, six sets of our every-day china and silverware, 2 cups, 2 mugs, a cheap stock pot that I can put on the grill, the crock pot, and a large stack of towls and ziplock baggies. 

It's already turning into a fun challenge to try to figure out each piece of the puzzle that we will need to make it through the next month without a kitchen.  In addition to the mobile pantry, we set aside two coolers - one for the "refrigerator" and one for the "freezer."  Luckily it's very cold outside right now and we can put these on the screened-in porch to stay cold.  We also turned a 2-drawer plastic file cabinet into a mobile pantry that has cereal, crackers, oil, vinegar, and the like.  Our grill is large and has a gas side-burner, and my co-worker has generously lent me her electric fry pan!  I think we'll be able to make it.  It will all be worth it in the end! 

Happy New Year!


The wonderful delivery men from Sears brought us a wonderful New Years present yesterday morning!  All of our new appliances for the kitchen renovation arrived, and luckily all fit through our narrow DC-row-house doors and hallways and are now being stored in our living room!


The delivery men had to take our front door entirely off its hinges, but I have to say they did an excellent job - not even one scratch on the walls!


This is the current state of our living room... we just have to remember it is only temporary!