In an effort to partially revamp my diet, and to follow my midwife's orders of no processed sugars or simple carbohydrates, I decided to try a healthy pumpkin muffin recipe to replace the craving for a slice of Starbuck's pumpkin loaf mid-morning. These muffins have a lot of ingredients, including some that you probably don't have hanging around your pantry already, but I think the extra effort is worth the signifcant cut in sugar, calories, and fat found in most baked goods.
Ingredients:
- 1 c whole wheat flour
- 1/4c oat or wheat bran
- 1/4c flaxseed meal
- 2t baking powder
- 1 1/2t baking soda
- 2t cinnamon
- 1/4t ground ginger
- 1/4t ground cloves
- 1/4t ground nutmeg
- 3/4c pumpkin puree
- 2 large eggs
- 3T canola oil (you maybe could use even less)
- 1c white grape juice concentrate
- 1/3c sugar free apricot preserves (I used sugar free even though I am very sensitive to that artificial sugar taste)
- 2t vanilla
- 2/3c golden raisins or chopped dried apricots
- 1/2c toasted chopped walnuts
- Mix together the dry ingredients (flour, bran, flaxseed, baking powder and soda, and spices). In a separate bowl, mix together the pumpkin, eggs, oil, grape juice concentrate, preserves, and vanilla until it is all a consistent texture. Add the wet ingredients to the dry ingredients and mix until just incorporated. Add the dried fruit and toasted nuts, as desired.
- Divide evenly into 12 muffins and bake at 350 degrees for 15-20 minutes.
I think the walnuts add a great toasty crunch to the finished muffins, even though I usually shy away from nuts in my baked goods. I also used the golden raisins, which plump up during cooking, and take on a very moist texture that almost blends into the rest of the muffin. Next time I might chop them up a bit, as they can get pretty large after they expand in the muffins.
Finally, I think you could substitute in a different juice concentrate for the white grape juice, if desired. Apple juice concentrate would probably work well.
Up next week: Triple blueberry muffins!
Friday, May 27, 2011


Sunday, May 15, 2011
Inspiration
Last week Cillian and I decided to rent a car and head down through the Appalachians. It was a wonderful, rejuvinating trip. We only drove a few hours any given day, and took time to wander and explore. We both returned feeling refreshed and with our creative energies restored. Here are a few of the highlights of the beautiful scenery we saw from Virginia to North Carolina.


Saturday, May 14, 2011
Barbeque Chicken and Vegetable Pizza
Tonight we made an awesome pizza for dinner, so I have to share it! For us, pizza is actually a great way to get a ton of veggies and some lean protein in a quick meal that is easy to clean up.
Ingredients:
- Pizza crust
- 1c finely shredded Parmesan cheese
- 1 chicken breast, cut into small pieces
- 1 red pepper, cut into bite-size strips
- 1/2 yellow onion, cut into bite-sized pieces
- 1/2 jalapeno pepper, very finely cut (more or less depending on your preference)
- 1-2 cobs of sweetcorn, cut off the cob
- 2oz chevre cheese
- 2-3c arugula
- 1T chili powder
- 2t cumin
- 1t oregano
- 2T smoked paprika
- 1T tomato paste
- 1/4c chicken or vegetable stock
- 1/4c barbeque sauce
- Salt and pepper
- Canola/Vegetable Oil
To prepare your chicken and vegetables, season the cut chicken pieces with salt and pepper, and smoked paprika. If you don't have smoked paprika, there's no need to run out and buy it for this recipe. You can substitute in some of the chili powder and cumin.
Saute your chicken pieces until cooked. Set aside. In the same pan, saute the red pepper, onion, and jalapeno until cooked but still crisp. Add chili powder, cumin, oregano, and salt and pepper and cook for another minute. Add tomato paste and cook for about a minute. The mixture should be pretty pasty at this point, so you will probably need to loosen things up with some stock (or substitute a little water for the stock if you don't have it on hand). Add barbeque sauce.
To assemble the pizza, first spread the Parmesan cheese onto crust. This will create a barrier between your crust and the wet ingredients, so your crust doesn't get soggy. Then add the arugula, corn, chicken, and sauteed vegetables. Top with crumbled chevre cheese.
Cook at 450 degrees for about 12 minutes.

Another great feature of pizza is that you can easily change it up and substitute in ingredients you may have on hand for those that you don't. This recipe itself was a first-time experiment based on a southwest-style salad we've been loving lately, but it turned out great!
Friday, May 13, 2011
Asheville Cotton Co.

Last week while I was in Asheville, NC and Cillian was busy running the Shut-In Trail (a 17-mile run over Mt. Pisgah with 5000 feet of elevation climb!) I opted to take it easy and visit the Asheville Cotton Co. This is a great little cloth store just outside of downtown Asheville, NC. Not only will you be inspired by the beautiful mountains and natural beauty of Asheville, but the fabric in the store is bright and fun, and definitely inspirational! This is not like so many other fabric stores in the south that is stocked full of restoration prints or civil-war fabrics in dull browns and mauves. Instead, it is full of bright fun prints - the perfect stop if you are planning a baby or kid's quilt.

The ladies working at the Asheville Cotton Co. the afternoon I visited were so helpful and friendly. They also had a sale table with great fabric at 50-70% off! I picked up a few bright colored fabrics that I think will be good additions to my stash.

Sunday, April 24, 2011
Chicky Quilt
Here is one of my most recent completions:


It is a very simple piecing and applique pattern, but turned out so cute! My friend Elle and I both made one of these together - it was so fun to pick out which yellows we would use for each bird. We bought a roll of various yellow prints and batiques and just had fun mixing and matching. Each chicky body and wing uses a different yellow fabric.
To assemble this quilt, just sew the corners onto larger white squares of fabric. Then applique your chickies, and complete with sashing and borders.

The other nice thing about this baby quilt is that it is unisex, so it makes a great gift for someone who is not finding out the sex of their baby until after it is born, or if you are like me and can't wait until you're 20 weeks along to start making baby quilts! That's right - this quilt is the first in line for Baby Lynch (aka Spud)!
Happy quilting!
Friday, April 22, 2011
Happy Earth Day and Homemade Laundry Detergent
Today is Earth Day - the perfect opportunity to step back and think about your individual impact on our planet. It is also a great time to teach kids about the importance of environmental responsibility. We can all do our small or large part to help keep the earth a pleasant place to live and raise our families.

In honor of Earth Day I am hoping to send all of my readers over to http://homemademothering.com/, a wonderful blog about keeping a home and raising a family in a way that reduces our impact on the earth and ourselves. This website/blog is run by Maureen, a friend of a friend in Chicago, who has two small children. Yet, she manages to do things like develop her own recipe for low-chemical laundry detergent and write a manifesto to help new parents figure out how to use cloth diapers.
About two weeks ago, I made a batch of Maureen's laundry detergent. We have been using it on our linens and clothes, and have not noticed any decrease in cleanliness or stain-removing power. What I have noticed, in particular, is the scent-free end result - clean sheets and clothes without a trace of chemical scent on them. And, you can feel good about using this detergent because you know everything that is in it.
I will just say that if you have a high-efficiency washer, you should treat this detergent like it is a powder as it is thicker than traditional liquid detergent. Other than that, we've been very happy with it and encourage you to give it a try!
Monday, April 11, 2011
Mixed Vegetable au Gratin
One way to change up your nightly vegetable serving is to bake it up with a little cheese and milk. Au gratin style vegetables will add some calories to your veggies, but this recipe compromises a little richness by substituting in skim milk

Ingredients:
- Mixed vegetables - I used one medium-sized head of cauliflower, 8 carrots, 4 small potatoes.
- 2T unsalted butter
- 2T flour
- 3/4c grated gruyere cheese
- 1/2c grated parmesan
- 2c milk
- 1/4c breadcrumbs
- Pepper
- Grated nutmeg
Cut your vegetables into bite-sized pieces. Arrange in an oven-safe baking dish. Preheat your oven to 375 degrees.
Make a roux by melting the butter in a saucepan over medium heat and then adding flour, constantly stirring for about 2 minutes, until the flour starts to cook a little. Add milk a little at a time while stirring. Bring to a light boil and then stir in 1/2c gruyere cheese, paremesan, nutmeg, and pepper to taste. Pour cheese mixture over vegetables. If it doesn't completely cover the vegetables, that's fine. It should come up about half-way.
Sprinkle a little of the remaining gruyere over the top, then the breadcrumbs, and top with a little more gruyere.
Bake for 20-25 minutes, until top is browned and vegetables are cooked.
This dish has a lot of flavor, and so it is a good accompaniment for chicken or other dish that won't compete with it too much.

Bon appetite!
Sunday, April 10, 2011
Strawberry, Banana, and Chocolate French Toast for Two
This is a great alternate breakfast for Saturday or Sunday Morning when you have a little more time and want to treat yourself to something sweet. It is easy to make, and so tasty!

Ingredients:
- 4 pieces sturdy bread
- 1c milk
- 2 eggs
- 1t vanilla
- Pinch of cinnamon
- 8-10 strawberries, thinly sliced
- 1 banana, thinly sliced
- 1c chocolate chips
Whisk together eggs, milk, vanilla and cinnamon.
Place a layer of strawberry and banana slices down on one piece of bread. Sprinkle about 15-20 chocolate chips on the fruit, and then top with another layer of fruit. Place second piece of bread on top, so you have a fruit and chocolate sandwich.
Preheat your skillet over medium high heat.
Carefully dip each side into the egg mixture so that the bread is wet.
Spray your skillet with Pam, if needed. Place french toast "sandwiches" into the skillet and cook, about 3-4 minutes per side, or until the toast is golden brown and the chocolate is melted.
While french toast is cooking, place remaining 1/2c or so of chocolate chips in the microwave and cook for about 45-60 second, until melted. Set aside.
Remove from the skillet, and cut in half along the diagonal. Top with more sliced strawberries and drizzle melted chocolate over top.

Ingredients:
- 4 pieces sturdy bread
- 1c milk
- 2 eggs
- 1t vanilla
- Pinch of cinnamon
- 8-10 strawberries, thinly sliced
- 1 banana, thinly sliced
- 1c chocolate chips
Whisk together eggs, milk, vanilla and cinnamon.
Place a layer of strawberry and banana slices down on one piece of bread. Sprinkle about 15-20 chocolate chips on the fruit, and then top with another layer of fruit. Place second piece of bread on top, so you have a fruit and chocolate sandwich.
Preheat your skillet over medium high heat.
Carefully dip each side into the egg mixture so that the bread is wet.
Spray your skillet with Pam, if needed. Place french toast "sandwiches" into the skillet and cook, about 3-4 minutes per side, or until the toast is golden brown and the chocolate is melted.
While french toast is cooking, place remaining 1/2c or so of chocolate chips in the microwave and cook for about 45-60 second, until melted. Set aside.
Remove from the skillet, and cut in half along the diagonal. Top with more sliced strawberries and drizzle melted chocolate over top.
Monday, March 21, 2011
Woops!
So much for my March Madness bracket. It wasn't looking so good for me after the first round, but I think this weekend was the death knell.


Thursday, March 10, 2011
Shrimp with Lemon Ginger Rice Pilaf
This weeks cooking class at culinaerie was focused on grains. It was mostly review, but we learned more about how various types of semi-processed grains are made. My partner and I also decided to experiment a little with the flavors of a traditional pilaf. We added lemon, ginger, and garlic to the usual shallots and butter. The result was outstanding! I made some sauted shrimp with lemon pepper seasoning to round it out into a meal.


Rice Pilaf
Rice pilaf is one of the easiest ways to make really flavorful rice. The typical pattern is to sweat onions in butter, then add rice and aromatics, toss to coat in the butter, then add the liquid and bring to a boil. Finish in a 400-degree oven for 17 minutes.
Here is how we tweaked this traditional procedure to make our ginger lemon rice pilaf:
Ingredients:
- Butter
- 1c basmatti (or other long-grain) rice
- ~2c chicken stock
- 1 shallot, finely diced
- 1 lemon (zest and juice)
- 2 cloves garlic
- 1T grated ginger
- Salt & Pepper
Melt the butter over medium heat. Add diced shallot and sweat until shallot is translucent. Add the ginger, lemon zest, and garlic and stir to incorporate. Add the rice and stir so that the butter coats the grains. This helps supress the starches on the outside of the rice grains, so that the rice does not get sticky.
Add the juice from the lemon plus enough chicken stock so that the total liquid is 2 cups. Bring to a boil. Cover and put in a 400-degree oven for 17 minutes.
For the shrimp, I simply seasoned it with lemon pepper seasoning and sauted it in equal parts butter and oil until it was nice and pink.
Garnish with parsley.
Tuesday, March 8, 2011
Signs of Spring
It was still only 32 degrees this morning when George and I went out for our morning run, but there are signs of spring popping up everywhere, including our front yard!


Spring is on the way.... hopefully it will be accompanied by a renewed dedication to my blog!
Wednesday, January 26, 2011
Left-Overs - Part 2: Chicken Curry Salad
With the other half of my left-overs from the weekend (balsamic-marniated chicken breast) and various vegetables and other items I had in the pantry, I made a very quick chicken curry salad:

- 1/2 cucumber, brunoised
- 1 large carrot, brunoised
- Handful green beans, cut on the diagonal into small pieces
- 1/4c slivered almonds
- Packet of pre-cooked barley and spices (similar to this)
- 2oz part-skim low-fat mozzarella cheese
- 1/4c plain yogurt
- 1T curry powder
- 1T lime juice
- 1t honey
- Salt and pepper to taste
Toss the first 7 ingredients together in a bowl. Mix the yogurt, curry powder, lime juice, honey, and slat and pepper together in a small bowl and then dress the chicken salad.
By using the leftovers and the pre-cooked barley/whole grain rice mix, you can really put this lunch together in a matter of minutes in the morning!
-

Ingredients:
- Cooked chicken breast, cut into 1cm cubes- 1/2 cucumber, brunoised
- 1 large carrot, brunoised
- Handful green beans, cut on the diagonal into small pieces
- 1/4c slivered almonds
- Packet of pre-cooked barley and spices (similar to this)
- 2oz part-skim low-fat mozzarella cheese
- 1/4c plain yogurt
- 1T curry powder
- 1T lime juice
- 1t honey
- Salt and pepper to taste
Toss the first 7 ingredients together in a bowl. Mix the yogurt, curry powder, lime juice, honey, and slat and pepper together in a small bowl and then dress the chicken salad.
By using the leftovers and the pre-cooked barley/whole grain rice mix, you can really put this lunch together in a matter of minutes in the morning!
-
Tuesday, January 25, 2011
Left-Overs - Part 1: Pasta with Chicken and Balsamic Mustard Sauce
Over the weekend I made chicken paninis for Cillian and his running buddy, Tom. I had bought four chicken breasts, and threw them all in the marinade of balsamic vinegar, water, chicken spice seasoning, and mustard seeds. I cooked three of the four breasts for our sandwiches, and left one lonely breast in the marinade. I also had some left-over cooked spagheti (dressed only with a little butter and parmesan), so here is what I made for lunch:

Ingredients:
- 1 chicken breast, marinated in balsamic, water, chicken spice seasoning, and mustard seeds
- Canola oil
- 2T shallots, finely minced
- 1/2c wine
- 1/2 - 1c chicken stock
- 1T mustard
- 1t mustard seeds
- Salt and pepper as needed
- Cooked noodles
Heat your oil in your pan. Add the chicken breast and saute until cooked. (You could cut your breast into bite-sized pieces before cooking, but I wanted to let it cook longer and really have the balsamic marinade get carmelized and dark, dark brown, so I left the breast whole and cut it up after it was cooked.)
Remove the cooked chicken, deglaze with wine, add shallots and cook until almost all of the liquid has evaporated. Add the chicken stock and mustard seeds and reduce until sauce consistency. Add mustard, salt, and pepper.
Toss noodles, chicken, and sauce. Voila, lunch in 20 minutes (also great reheated)!

Ingredients:
- 1 chicken breast, marinated in balsamic, water, chicken spice seasoning, and mustard seeds
- Canola oil
- 2T shallots, finely minced
- 1/2c wine
- 1/2 - 1c chicken stock
- 1T mustard
- 1t mustard seeds
- Salt and pepper as needed
- Cooked noodles
Heat your oil in your pan. Add the chicken breast and saute until cooked. (You could cut your breast into bite-sized pieces before cooking, but I wanted to let it cook longer and really have the balsamic marinade get carmelized and dark, dark brown, so I left the breast whole and cut it up after it was cooked.)
Remove the cooked chicken, deglaze with wine, add shallots and cook until almost all of the liquid has evaporated. Add the chicken stock and mustard seeds and reduce until sauce consistency. Add mustard, salt, and pepper.
Toss noodles, chicken, and sauce. Voila, lunch in 20 minutes (also great reheated)!
Quilt for Baby Sprout
Here is the finished quilt that I offered a sneak-peak of last week. It is for my good friend Kristen's baby on the way... "Baby Sprout" for now.


Monday, January 24, 2011
Kitchen Renovation - Before and After
Our kitchen renovation is complete, except for a few finishing touches. The contractors will come back for one more day to install the last cabinets (which had to be reordered because the space was slightly too tight for what we had ordered), finish the backsplash around those cabinets, put on the hardware, and finish some touch-up painting. We were able to move back into the kitchen and I even cooked a full meal this weekend!


And here is a good picture of the amazing change in our floors!


So much better! We're still trying to figure out why anyone would cover these beautiful wood floors with faux-brick linoleum!
Thursday, January 20, 2011
Kitchen Renovation - Day 13
The most impressive progress today was in the bathroom. The toilet was supposed to be installed today, but we learned that our old toilet has a crack in it and so instead of re-installing it, we are going to buy a new one. Brandon found a good deal on one, so hopefully the bathroom will be fully up and running after one more day!

There is also a little bit of baseboard that still has to be added on the wall with the sink. The crew is also going to make us a radiator cover for the small radiator in the corner. This was the only radiator in the whole house that didn't have a cover. We researched various options on how to make our own radiator cover or how much it would cost to have someone make one for us. We were surprised to learn how expensive they can be. So we're thrilled that the guys offered to make one for us as part of our contract. They are going to use a left-over piece of granite from the kitchen countertop for the top, so it will function like an extra shelf in the bathroom.

After having trouble fitting the kitchen pendant light in, I was a bit worried about my selection for the bathroom, but I think it works great!

There is also a little bit of baseboard that still has to be added on the wall with the sink. The crew is also going to make us a radiator cover for the small radiator in the corner. This was the only radiator in the whole house that didn't have a cover. We researched various options on how to make our own radiator cover or how much it would cost to have someone make one for us. We were surprised to learn how expensive they can be. So we're thrilled that the guys offered to make one for us as part of our contract. They are going to use a left-over piece of granite from the kitchen countertop for the top, so it will function like an extra shelf in the bathroom.

After having trouble fitting the kitchen pendant light in, I was a bit worried about my selection for the bathroom, but I think it works great!
Wednesday, January 19, 2011
Kitchen Renovation - Day 12
My new pantry is in!
Brandon and his crew made these custom doors to mimic the pattern of our cabinets. They selected the trim pieces and tacked them on to flat-pannel doors to add some detail. They also custom-made the trim around the pantry doors, which looks almost exactly like the old trim around all the rest of our doors. I'm so thrilled.... wait until you see what is going inside the pantry!
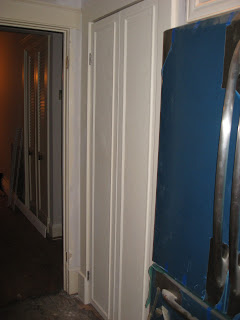

Brandon and his crew made these custom doors to mimic the pattern of our cabinets. They selected the trim pieces and tacked them on to flat-pannel doors to add some detail. They also custom-made the trim around the pantry doors, which looks almost exactly like the old trim around all the rest of our doors. I'm so thrilled.... wait until you see what is going inside the pantry!

We were left with a little bit of space above the pantry that was not going to be very accessible from inside, so we decided to make it open to the outside. This was originally conceived of as a shelf for cookbooks, but I think it's a bit high to reach and it may be the perfect space for some much-needed wine storage!

Tuesday, January 18, 2011
Taylor's Refresher
 We spent this past weekend in Napa Valley, tasting wine and eating good food. One of the best meals we had was a pair of late-afternoon burgers at Taylor's Refresher, right on Highway 29, the main road that runs through the Valley.
The place is just a classic walk-up counter stand, with a good selection of various burgers and other sandwiches topped with all kinds of great additions. Cillian's was some kind of mushroom cheeseburger, but I'm pretty sure he picked it because it was served up on sourdough toast.

Mine was one of those low-cal burgers with an enormous onion ring, bacon, blue cheese, barbeque sauce, and pickles. It was amazing.

For two wine-weary travelers, this was a great rejuvinator pit-stop.
\
Kitchen Renovation - Day 11
After being away all weekend, we came home to a great surprise - - our backsplash and countertops are done! We selected a 1x2" alabaster marble subway tile for the backsplash, with snow white non-sanded grout. I think it looks great - very clean and polished. And it really ties everything together.

Here you can see the finished countertop on the fridge-side. We opted for an overhang past the last cabinet so that there is a place for Cillian to sit while I'm cooking. We couldn't fit another cabinet in that spot, but also wanted to maximize whatever counter space we could. I think it turned out really well.

Our sink and faucet are also now fully installed and working. We went with a D-Shaped sink, which is definitely big enough to wash pots and pans, but doesn't take up as much valuable counter space as a double welled sink. I think it was a good choice - - yet another recommendation of Brandon that turned out so well.

And finally, our bathroom renovation is really getting underway! Mike laid all of the tile. I think it looks great. Very clean and classic looking. The white octogons are also made out of the white alabaster marble that our backsplash is made from. We're really moving now!

Saturday, January 15, 2011
Bathroom Renovation - Color Pallete
Alongside our kitchen renovation, we are also completely renovating our powder room, just off the back of the kitchen. In all of the kitchen hubub, this has nearly been forgotten! The powder room is small, but has very high ceilings like the rest of our house, and a window out onto the screened-in porch (which will be appropriately covered with a window treatment). For the floors we have picked out a very traditional tile, like this:

It is made out of alabaster marble and black marble. We bought a porceline pedestal sink, and are re-using the porceline toilet. Our contractors are going to make a radiator cover for the small bathroom radiator, and use a left-over piece of our granite countertops for the top of the radiator cover. This way it can double as a shelf.
Here is what we are thinking of for the color pallete:

We are thinking of using the second-darkest blue - "Gentleman's Grey" - on that color wheel. (I only had a sample of the tile in the basketweave pattern, but it is the same material, so you can see what the colors will be.) The tile and color wheel are sitting on top of our kitchen counter.
What do you think?
Subscribe to:
Posts (Atom)