Friday, October 22, 2010

Caramel Apple Pork Chops and Sweet Potatos

Caramel Apple Pork Chops Ingredients:
- 1T butter
- Flour, salt and pepper
- Thick-cut pork chops
- 1/2c white wine
- 1/4c apple cider vinegar
- 1T + 1T brown sugar
- 1/2c + 1/4c applesauce
- 1t + 1Tcinnamon
- 1t allspice
- 4 large sweet potatos


Cook your sweet potatos in the oven at 400 degrees for about 45 minutes, or until soft.  (Note:  you could also cook these in the microwave.)  When they are cooked you should be able to cut the tip of the potato skin and then pull the skins off. 

While your sweet potatos are cooking, melt the butter in a frying pan over medium high heat.  Liberally season pork chops with salt and pepper and then dredge in the flour.  When the butter is hot, add the pork chops to the pan and cook about 3 minutes on each side, or until the pork chops are golden brown on each side but uncooked in the middle.


Add white wine and vinegar to your frying pan.  It will bubble up a little, reduce the heat to a low simmer.  Cover and cook chops for about 30 minutes, until done.

When pork chops are done, transfer to a cookie sheet and put in a 200 degree oven to keep warm. 

You will probably have a lot of cooking liquid in your frying pan.  Increase the heat and simmer to reduce by at least half.  Add 1T brown sugar, 1/4c applesauce, and 1t cinnamon.  Cook to heat through.  This sauce is a Show Stopper; it is so sweet and savory, and compliments the pork chops perfectly.  It would probably be good on short ribs or other slow cooked meat.


Finish the sweet potatos by mashing, add 1/2c applesauce, 1T cinnamon, and 1t allspice.  Make sure everyting is mashed well.


Serve and enjoy!

Wednesday, October 20, 2010

Pumpkin Chili

With fall and winter fast approaching, I decided to make chili over the weekend.  I also was persuaded to try to incorporate pumpking into my chili recipe.  I have to admit the results were mixed.  I will post my standard chili recipe soon, and still have yet to find a better version.

Ingredients:
- 4 garlic cloves, finely minced
- 1 jalapeno, finely minced
- 1 large onion, diced
- 2 green peppers, diced
- 4T chili powder
- 1T cumin
- 2t dried oregano
- 8 cups chicken stock
- 1T worscestershire sauce
- 2T dijon mustard
- Large can diced tomatos, undrained
- 1 package dried great northern beans, cooked
- 2 chicken breasts, cooked and shredded

Heat 1T vegetable oil in a large stock pot over medium heat.  When hot, add garlic, jalapeno, onion, and green pepper.  Cook until soft, about 5 minutes. 

Add chili powder, cumin, and oregano.  Cook an additional 2 minutes.

Add chicken stock, worcestershire, dijon, pumpkin, tomatos, and beans.  Bring to a boil and gently simmer for about 20 minutes.  Add the chicken breasts.  You can keep the chili hot over low heat, covered, as long as needed until you're ready to eat.

Serve with shredded cheddar cheese, sour cream, and corn bread.


Note:  For my standard recipe, omit the pumpkin and add 1 jar chili sauce, found in near the katchup in the grocery.

Quilt for K.I.F. - Selecting the Pattern and Fabric: Irish Crosses in Pink and Purple

A while ago I posted about the baby quilt I made for our niece.  She has now moved into a very big big-girl bed and it's time to make her a new quilt!  After much deliberation and consultation with various quilting mentors, I decided on Irish Crosses in pinks and purples. 

Here is a picture from my pattern book.  Just imagine the dark green areas in dark purple small prints and the light green areas in light pink batiques.  I have also modified it so that each "cross" has two rows of triangles instead of four.  One of these days, I promise to make a quilt where I just follow the instructions.


Each block consists of one center square in the theme fabric, with a row of light pink triangles and a row of dark purple triangles.


After hemming and hawing over dozens of fabrics, we decided on these:


The purple print fabric in the middle will make up the "theme" squares, with the dark purples and light pinks making up the triangles for the croses.  The pink print fabric at the top will be the borders. 

And this fabric is for the back:


I just hope that it is girly enough for our little princess niece!


Tuesday, October 19, 2010

Eggs with leftover vegetables and fresh herbs

Eggs are one of the best breakfasts - high in protein, low in calories and fat, you can add all kinds of good vegetables and herbs to them, and they're cheap and fast to cook in the morning!  Who could ask for more? 

This morning, when I realized that we are out of all my normal breakfast foods (i.e. eggo waffles), I had to scrounge around to find a substitute.  I have never been someone who can skip breakfast.  Maybe this is a result of growing up in Minnesota and being treated to a hot breakfast each morning in the middle of winter when it was still dark and bitterly cold outside.  But whatever the reason, it resulted in a great concoction this morning.

You really can add just about anything to eggs.  I just used the few things I had around the kitchen this morning:

- 4 eggs
- 1 finely chopped yellow bell pepper
- Finely chopped red onion (about 3T)
- 5 cherry tomatos, quartered
- Finely chopped basil, oregano, and rosemary
- Salt & Pepper
- Chevre

Saute your vegetables in a little Pam for about 3 minutes.  Add your eggs into the pan.  Break them directly into the pan and then break the yolks in the pan.  I heard once that this helps retain the beneficial proteins of the egg instead of breaking them up by whisking.  Then add in your herbs, salt, and pepper and cook until eggs are done, ocassionally scraping up the done eggs from the bottom of the pan and folding them back into the mixture.  When the eggs are cooked, turn off the burner and add the chevre. 

Meanwhile, toast a piece of whole-wheat bread.  Top with the egg mixture. 


Voila, a hearty healthy breakfast!

Monday, October 18, 2010

Pumpkin Rum Cake (or Coffee Cake)

Seeing as how we have seemingly really entered the fall season here in D.C., I made a number of pumpkin dishes over the weekend to test various uses of the ubiquitous can of Libby's.  I made a pumpkin chili and pumpkin rum cake.  My conclusion is that pumpkin can be added to nearly anything without really changing the flavor.

This pumpkin rum cake recipe comes from the recipe book from a "Chunkin' Punkin'" festival in Delaware. This recipe is extremely easy, but I will warn you that the end result is very sugary.  I actually much preferred it as a coffee cake with some bitter black coffee as opposed to a dessert.  To each his own though.

Ingredients:
- 1 box of yellow cake mix
- 1 box of vanilla pudding mix (about 3.4oz)
- 4 eggs
- 3/4c white rum, divided
- 1c butter, divided
- 1/2c walnuts
- 1 can pumpkin
- 1c sugar

Preheat your oven to 325.

To make the cake, combine the cake mix, pudding mix, eggs, 1/2 cup of the rum, 1/2 cup butter (melted), and the can of pumpkin.  Mix well.  Pour into a cake pan.  I used a 8x13 pan, but the recipe actually calls for a bundt pan.  Bake at 325 degrees for about 30-60 minutes (30 minutes for the 8x13 pan, longer for the bundt pan).

When the cake is done, combine the remaining 1/2 cup butter, 1/4 cup rum, and 1 cup sugar in a small saucepan on the stovetop over medium heat.  Cook until the butter is melted and the sugar totally dissolved, then cook about 2 minutes longer, or until the mixture gets thick and syrupy.  Pour the glaze over the top of the cake.  Serve!

Sunday, October 17, 2010

Homemade Chicken Stock

I am convinced that homemade chicken stock is one of the best kept secrets in cooking.  I have to admit that I am a recent convert.  When I first learned how to debone a chicken, I really did not believe that I would have the time and energy to make my own stock on a regular basis.  Now I make stock nearly every weekend.  My husband calls it the "magic stock" because all of my recipes are so much improved just by using it.  The best part, is that it is extremely simple. 

Stock is basically made of just raw bones and water.  The other ingredients are for added savory flavor.  If you have tried to make stock out of cooked bones (like a roast chicken carcass), you were probably disappointed by the result.  This is because cooked chicken bones no longer contain collagen, the ingredient needed to make stock.  For those chemistry buffs out there - stock is made by covering bones with collagen in them with cold water, then bringing to a boil to convert the collagen to gelatin.  It is the presence of gelatin in stock that allows the flavors to linger in your mouth when you're eating.  It also gives it a tiny bit of body.  Not much, but just enough to notice.

My last post described how to debone a chicken to give you the bones needed for your stock.  You may be wondering where to get enough vegetable bits.  My sauces teacher advised us to keep a freezer baggie in the freezer and when you're cutting up onions, carrots, or celery, just throw the unusable ends and other bits into that bag.  Keep it in the freezer until you're ready to make stock.  Voila! 

You may also use herbs to flavor your stock.  A very classic combination is parsley stems, dried thyme, and/or a bay leaf.  You can apply the same theory from saving unuseable bits of vegetables to your herbs - just throw the woody stems or other undesirable bits into the freezer bag as you go.  You'll add great flavor to your stock with the added bonus of using all of the herbs you pay so much for at the grocery.

So, to make the stock, you will need raw bones, vegetable pieces (onion, celery, and carrot work best), and any herbs you want to use (parsley stems and a bay leaf are classics). 

- Combine everything in a stock pot and cover with enough cold water that the bones and vegetables are submerged by a couple of inches. 

- Turn on the stove top and bring the water to a boil.  Leave uncovered to gently simmer or boil very softly for several hours.  Taste your stock periodically; you will be able to tell when it is condensing and developing.  If it seems too watery after a few hours, you can turn up the heat to boil off more of the water, further condensing the stock flavors.

- When your stock is done, pour through a sieve into a bowl.  You'll notice the vegetable bits are mushy and the bones are brittle (this is because there is no collagen left in them).  Make sure to press down on your mushy vegetables and brittle bones to get all of the flavorful stock out.  Throw away the used ingredients in the strainer.

- Season your stock with a little salt and pepper to taste.  You can either use your stock right away or let cool.  If you let it cool, the fat will rise to the top and solidify.  Just skim it off when you go to use your stock. 

What could be easier?  Just leave your simmering stock on and go about your morning or afternoon.  It is really hard to screw this up.  If you over-cook it, just add a little more water to dilute.  If it isn't condensed enough, keep boiling. 

And trust me, you'll be happy you have homemade stock during the week to add that extra TLC to your meals.  Happy cooking!

Deboning a Chicken

If you haven't tried making your own chicken stock, you should definitely start!  It is very easy, and really enhances all of the dishes you make with it.  Plus you control the amount of salt you add, so you can cut your sodium intake.  Those store-bought chicken stocks use lots of salt to make up for cutting other ingredients.  I promise, it is very easy.  All you need is chicken bones and the spare clippings off of the vegetables you've used the week before. 

I like to start with a whole chicken, remove the meat and save for cooking during the week, and use the carcass and internal organs for making the stock.  This post will cover how to debone your chicken.


Step 1:  Get to know your chicken
- Take your chicken out of the plastic and look inside the opening and pull out any internal organs or the neck that are usually sold with the chicken. Orient your chicken so that you could shake its "hand" and then lay it back on its back.  Now your chicken is ready to start cutting.


Step 2:  Remove the legs
 - You are going to cut the legs off first.  Start by slicing the skin right where the leg meets the body of the chicken.  A shallow cut here should expose the hip joint.
 

- Complete the cut by continuing to cut up towards the wings, continuing to expose the hip joint.   Then turn your chicken over.  Continue your cut up around the top of the hip.  You should use the tip portion of your knife and feel your way.  Don't cut through any ribs or any bones at this point.  There is a tender meaty portion on the back of the chicken known as "the oyster."  Make sure you get this in the leg piece you are cutting off.  In the picture below you can see that I've just cut around the oyster. 


- Continue your cut down, getting all of the thigh meat.  Turn your chicken back over on his back.  At this point the leg should be mostly cut off, with just the bone holding it together.  Pull the leg back towards the back of the chicken, fully exposing the joint.  You may hear a pop as the hip dislocates.  Find the space between the two bones with the tip of your knife.  It should be easy to cut through this joint.  Now your leg is free. 

- Repeat on the other side.  

Step 3:  Remove the wings
- Next you are going to remove the wings.  First, find the very last joint on your chicken's wing.  Place the part of your knife closest to the handle on this joint and then firmly push down with the heel of your left hand.  The tip of the wing should cut off very easily.  This part of the wing has very very little meat and is best used in your stock.  Reserve these bits.


- Now bend your chicken's wing back to find the shoulder joint.  When you've found it, cut through the joint, removing the wing.

 Step 4: Remove the breasts
- To remove the breasts, start by laying your now legless and wingless chicken on its back.  Find the point of the breastbone and make a shallow slice on top of it, making sure not to cut into the bone.  


- Next cut off one of the breasts by following the rib cage down, making small slices as you go and pulling the breast meat away as you go.  This will help you get all of the meat on the breast and not on your carcass.

- Repeat on the other side.

Step 5:  Finishing
- Now that you have deboned your chicken, make sure to set aside the carcass, wing tips, and inner organs + neck for your stock.  


- You should have two legs, wings, and breasts for cooking.  I like to store my chicken pieces in a plastic bag (like the type you get in the produce department) and then inside a large Tupperware container in the fridge for use during the week.  


I like to debone my chicken(s) and get the stock going first thing Saturday or Sunday morning.  This way you'll have chicken pieces and fresh stock for the week, plus your house will smell delicious all weekend.

If you've never deboned your own chicken and made stock from scratch, I totally understand that it can be very intimidating at first.  But rest assured, after you've cut up a few chickens, you'll be able to do this in under 5 minutes easily; you will have fresh home-made stock to use, which is worlds better than the store-bought stuff; and you will save money as whole chickens are cheaper than chicken parts and stock.  It is definitely worth the effort (which is minimal)!

Thursday, October 14, 2010

Equipment Review - Serrated Peeler

Last week when I was at my local Sur La Table buying new metal bowls, I overheard the sales clerk explaining the difference between a regular peeler and serrated peeler to another customer.  Since they were on sale I decided to give it a try.  It is fabulous!  Since buying it, I have used it on several squash and a mango.  The serrated teeth of the peeler "bite" into fleshy fruits and vegetables amazingly well.  It also will grip tough skins like that on the squash. 


All colors of peelers are on sale at Sur La Table, available on their website.  This tool is definitely worth the $2 investment, especially this time of year when you might be cooking with pumpins and squashes and other stubborn hard vegetables.


Wednesday, October 13, 2010

French Salade Superb

My mom and I made this salad for a bridal shower we hosted about 2 years ago.  The recipe is adapted from one found in Rachel Ray's 365 30-Minute Meals.  My mom is hosting another shower next month and asked for this recipe.  So in a shameless attempt to get her to read my blog, I've posted it here.  This salad is very flavorful and substantive, and can be a good alternative to a standard lettuce salad, or can stand beside a regular letuce salad without seeming redundant.


Ingredients:
- 2.5 lbs red-skinned potatos
- 8 sliced bacon
- 3T olive oil
- 1 medium red onion, quartered and thinly sliced
- 4c coarsely chopped kale (1 bunch)
- 3T red wine vinegar
- 1c stock (I have always omitted this ingredient)
- 1/4c finely chopped flat leaf parsley
- Large package of spinach leaves (can also use mixed greens or frissee)

Directions:

Put the potatos in a pot and cover with water, bring to a boil, salt the water, and add potatos.  Boil until cooked, about 15-18 minutes.  Drain potatos and when cooled enough to handle, cut into quarters.

Cook the green beans until just cooked but still crisp.

Crisp the bacon.

Heat a medium skillet over medium-high heat and add about 2T olive oil.  Add the red onion slices and saute until just tender, about 5 minutes.  Add the kale in small bunches until all is wilted down.  Add the vinegar (and broth, if desired) and remove from heat.

Toss the potatos, green beans, kale mixture, bacon, and spinach together.  If you are making this salad ahead of time, combine all ingredients except spinach and toss with spinach at the end.

Enjoy!

Ten Minute Dinner - Ravioli with Brown Butter Balsamic Sauce

Usually I avoid the "easy" recipes because they often leave me feeling like something is missing.  This recipe definitely does not!  It is quick just because of the nature of the prep methods, not because something is being dumbed down or left out.  And the result is oh so wonderful.

Ingredients:
- Store-bought ravioli (~18 ounces)
- 6oz unsalter butter (if you only have salted, you can make it work)
- 2-3T balsamic vinegar
- Salt & Pepper
- Sage (optional)

Instructions:
- Brown your butter in a small saucepan over medium heat.  If you've never made brown butter before, it can be a little intimidating, but once you've done it once you'll wonder why you'd ever use regular butter again!
- Put the butter in your pan and heat over medium heat.  The butter will start to foam and bubble.  This is the water being released from the butter.  You can swirl or stir your saucepan occassionally as this progresses.  Once the foaming subsides, the fat solids in the butter will start to cook and toast.  You'll notice little brown toasty bits in the bottom of your butter, as well as the liquid butter fat starting to take on a nutty color and flavor.  The pictures below show first the butter in the initial bubbly/foamy stage and then nearly cooked.


- Once the butter smells nice and toasty/nutty, remove it from the heat.  I usually transfer it to a bowl at this point to make sure the cooking stops.  The last thing you want is bitter burnt butter.


- Put your balsamic vinegar in a blender (or if you are very good at emulsifying with a whisk, you can leave it in the bowl), turn it on, and slowly drizzle your brown butter into the vinegar.  Blend for just a few seconds, until emulsified.  Add a pinch of salt and pepper for seasoning.  If you want, you could add sage, or other herbs here. 

- Meanwhile, cook your ravioli according to the directions on the package.  We used goat cheese and basil ravioli from whole foods, which were amazing.


- Toss the ravioli in the brown butter balsamic sauce and serve!


Bon appetite!

Tuesday, October 12, 2010

Figs, Blue Cheese, and Prociutto

I was inspired by all of the figs at my local grocery.  Somehow I can't keep away from them the past couple of weeks.  So I decided to conduct an experiment by selecting two different types of figs, two different types of blue cheese, adding prosciutto, and balsamic and making two different small plates. I selected the Black Mission Figs (on the left) and Brown Turkey Figs (on the right). 


For the cheeses, I picked a Cambazola and Valdeon Blue.  The Cambazola is a softer milder cheese with a rind, which looks like brie.  The Valdeon Blue cheese is a more classic, sharper blue cheese. 


Prosciutto-Wrapped Figs with Blue Cheese:
- Fresh figs
- Blue cheese
- Prosciutto 
- Balsamic Vinegar

- Cut the top stem of the figs off, and then cut an "x" about two-thirds of the way down the figs. 
- Put a small slice of blue cheese in each fig
- Wrap with a thin slice of prosciutto (about 1 inch wide)
- Place in a baking dish and drizzle each fig with a few drops of balsamic vinegar
- Bake at 400 degrees for about ten minutes or until heated and cheese starts to soften


Fig, Prosciutto, and Blue Cheese Crostini: 
- Figs, cut up into eighths
- Blue cheese
- French bread, cut into thin slices
- Prosciutto
- Olive oil
- Water
- Balsamic vinegar 

- Put the cut up figs in a saucepan with enough water to cover the figs, and a splash of vinegar.  Cook until moisture is reduced, sauce is thick, and figs are very soft.  If desired, you can smash the figs with a fork or a potato masher at this point.
- Toast the sliced french bread in a 400 degree oven for about 5 minutes
- Put a small amount of prosciutto and goat cheese on each toast
- Top with fig topping


I made each recipe with both types of figs and both types of blue cheese.  With Cillian as a willing test-taster, we evaluated each option.  We both agreed that the black mission figs were more flavorful and better in both recipes.  The Cambazola was the winner for the crostini because it is milder and creamier, and complimented the figs well.  While I am a huge fan of very stinky cheese, this milder choice would probably be better for a wider audience.  The soft Cambazola did not work well, however, for the prosciutto-wrapped figs because it melted out and made the dish messy.  For the prosciutto-wrapped figs we recommend sticking with the traditional, hard blue cheese.

Bon appetite!

Monday, October 11, 2010

K.I.F.'s First Quilt - - The Quilt that Started It All

This is the very first quilt I ever made.  It was almost exactly five years ago.   My boyfriend at the time (now my husband!)'s sister was pregant with her first child and I didn't know what to get for a baby gift.  A law-school friend and now quilting mentor (who has her very own blog here:  http://elle-mental.blogspot.com/!) insisted that I could make a baby quilt in a weekend, and so the fun began!  Although this quilt definitely took longer than a weekend to finish, we were able to buy the fabric and piece the top in a day.  (A very long day...)  We had such a great time, that we've now made numerous quilts together and almost always go to our fabric store together when we're starting new projects.

This quilt was a very basic log cabin around this fun printed zoo animals.  Readers of my blog will recognize the zoo animals from another quilt that I made out of my stash. 


It is fun seeing the original pictures of this quilt.  Since it was made, it has been very well-loved.  My niece recently brought it on a family vacation, and it has definitely faded and been worn in!  There is nothing better than seeing a quilt you put so much time and effort into being well used though. 


I only quilted in the ditch around each piece, but I think it turned out well.  I hand-quilted the center block, but machine quilted each other block.  Machine quilting is supposed to hold up better to wear and tear, so it's probably a good thing I didn't hand quilt more of this one.  Since this quilt, however, I have hand-quilted every quilt.  Hopefully they hold up, but all of my quilts come with a lifetime service guarantee in case any seams come undone or any quitling gets loose.  


This is a very basic quilt that anyone really could piece together in a weekend.  All you have to do is find a patterned fabric that you like.  Decide what size blocks you are going to make by measuring each of the squares.  (Sometimes with these fabrics, the squares are not perfectly equal, but just pick a size and stick with it for all of the blocks.)  Then cut your log cabin prints into 2-inch strips, and start sewing.  You can go around each block as many times as you want... using four fabrics and two "frames" around each block worked well for this quilt.

I was not planning on doing any sashing, but once we had all of the log cabin blocks together it was obvious that it needed something coherent to pull it all together and to make it more girly.  Luckily, Elle has the best stash ever, and so this perfect pink was in there just waiting to be used on this quilt!


This quilt had a pieced back.  Elle is a big fan of pieced backs.  I have to say, by the time I get to the back, I'm usually just ready to get the thing assembled and start quilting it.  This one definitely turned out well and I will have to think about doing some sort of pieced back on the new quilt I am making for my niece.

Friday, October 8, 2010

Have you heard?


Unfortunately we won't be able to go to the Rally... we'll be in Ireland that week ... but we're encouraging everyone else we know to head down to the Mall and check it out!  (And report back every detail so we know what we missed!

Thursday, October 7, 2010

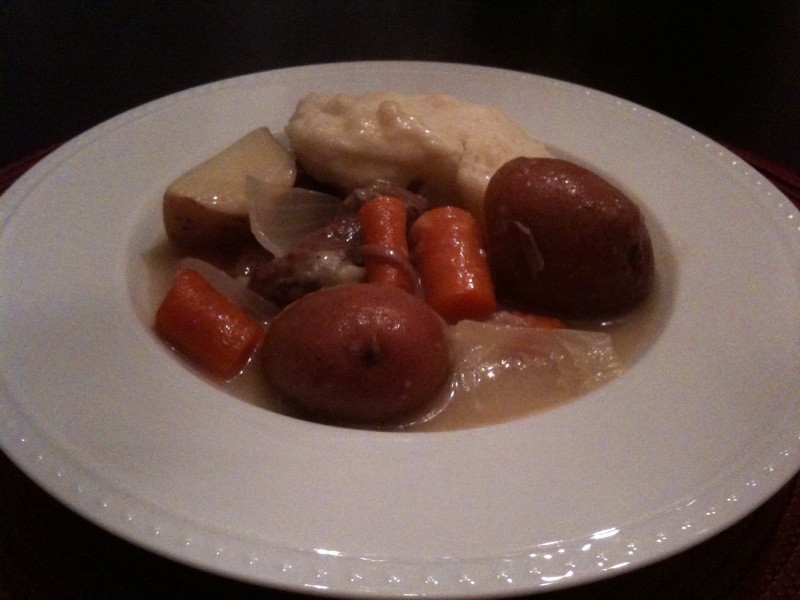
Grandma's Stew

This is perhaps the easiest homestyle comfort food recipe you will ever make.  It really couldn't be easier, and the result is so comforting and perfect for a crisp fall or cold winter day.  I love this time of year when we can start transitioning into all the fall food we had to abandon in the heat of the summer!  Last night I made this very simple stew, based on my grandmother's recipe.  We took the dogs on a walk while it was cooking and came home to a great smelling very homey home!  It made me nostalgic for those cold Minnesota winters when I'd get home from after-school activities and the house would be warm and cozy with the great smell of dinner cooking.

Ingredients:
-  1lb stew meet (either buy it pre-cut or buy a brisket and cut it yourself)
- About 6 large carrots
- About 2lbs potatos (you can use less, I live with an Irishman and so have to add more potatos to every recipe!)
- Medium yellow onion, cut into bite-sized chunks
- Oil
- Flour
- Salt & Pepper
- Beef boulion
- Bisquick
- Milk

Take the stew meat out of its package and make sure the pieces are about the same size.  Cut them down if needed.  I usually like my pieces to be between one- and two-inch cubes. 

Start heating about 3T vegetable/canola oil in the pan.  I like to use a heavy cast iron enamel pot for stew.  You can get the oil very hot at the beginning to sear your meat, and then reduce the flame to the lowest possible level and the pot will retain that heat and evenly cook the stew.  When the stew is done, you can leave the pot on the stove and it will retain its heat so that your second and third helpings are still hot!

Season generously with salt and pepper, and then toss in flour to coat.  You can save the left-over flour from this step to make your tickening agent for the gravy.


Add the meat to the hot oil, just searing on each side.  Do not cook the meat through at this point.  As soon as the meat is seared on each side, add enough water to almost cover the meat.


Once the water starts to bubble, reduce the heat to very low, cover, and let simmer ever so gently.  My recipe says to let simmer for 3 hours, but I rarely have this kind of time.  Try to let it cook at least one hour.  The longer it cooks, the more tender the meat will be.

When the meat is cooked and tender, add the vegetables.  You will need to add more water at this point.  You want the water to almost cover everything. 

At this point you are also going to add a flour/water thickening paste and your beef boulion to complete the gravy.  Mix water into your left-over flour from the first step to create a paste.  Add this to your stew pot.  You can start with a small amount and keep adding until it is thick enough.  Remember that the gravy will thicken quite a bit when it cools.  I usually add about a quarter cup of flour (mixed with about a half cup water) at this point. 

Next add your beef boulion.  I use the kind that comes in individual packets, and two packets is usually sufficient. 

Taste your gravy and season if necessary. 

Cover and let cook at a gentle simmer until your vegetables are nearly cooked through (probably 30 minutes). 

Mix together bisquick and milk according to the directions on the box for dumplings (I think it is 2 cups bisquick and 2/3 cup milk).  Drop the dumplings into the stew.


Cook uncovered 10 minutes and then covered 10 minutes.


Serve and enjoy!


Wednesday, October 6, 2010

Fig and Apple Compote

There are some nights when I get home and just don't want a big meal.  This is usually days when I've had too large of a lunch or have been snacking all afternoon.  My solution last night was to pull ingredients from the fridge and make a very seasonal cheese plate.  Of course, you could also make this as an hors d'oeuvre to have out when company comes for dinner and you're still putting the finishing touches on things!

This fig and apple compote is a great way to use some of the most flavorful fall ingredients.  You can find fresh figs in most grocery stores right now.  I used black mission figs, but any kind will do for this recipe.  I also used a tart granny smith apple.  A touch of good balsamic vinegar will really bring out the flavors and balance the sweetness of the fruit with a hit of acid.

Ingredients:
- About 6 figs
- Granny smith apple (or other tart cooking variety)
- 1T balsamic vinegar
- 1T sugar
- Tiny pinch of cloves and nutmeg
- Water

Chop up the figs and apple.  I left the skin on my apple, but you can peel it if you prefer.

In a small saucepan, combine the figs, apples, a splash of vinegar, and a little water.  There should be just enough liquid that you can get it boiling.  As the fruit cooks, it will release its own juices (and then reabsorb some) so you don't need too much water.


As it cooks, the fruit will naturally release its juices.  Continue cooking it so that the juices get thick and almost syrupy.  At this point, taste the compote and add sugar if needed.  Add a tiny pinch of cloves and a tiny pinch of nutmeg.  You can also add in other ingredients here if you like.  I think ginger could be a great addition.

You can cook this until it gets to the texture you like.  I cooked mine so that the fruit was soft and fully cooked, but still in distinguishable pieces.  If you continue cooking you can reach a soft/mushier consistency - more like applesauce.

I served the compote with tree-ripened italian plums, brie, and crackers.  It was a great light meal for a cold fall day!


Bon appetite!


Tuesday, October 5, 2010

Creamy Tomato Pasta with Kale

This is a great weeknight, easy recipe for fall or winter.  The kale and tomatos make it seem almost health despite the cream sauce!

Ingredients:
- 1 bunch kale (can use green, red, or rainbow), cut into ~1/2 inch strips
- 1 can crushed tomatos (I used fire-roasted)
- 1 medium sized yellow onion, finely chopped
- 2 cloves garlic, finely chopped
- 1 cup heavy cream
- 1 cup chicken stock
- 1 cup shredded good parmesan
- 1 package wide egg noodles
- Olive oil
- Salt and pepper

Heat about 2T olive oil in a pan.  When hot, add the finely chopped onions and garlic.  Saute until soft and translucent.  Meanwhile, get your water boiling for your pasta.  When it is ready, salt the water and add the egg noodles.  You can substitute in different pasta, but I think a wide noodle is good for this sauce. 

Add the canned tomatos with their juice and the kale.  the kale will seem like an enormous amount, but don't worry it will cook down significantly!


Once the kale is wilted, continue to cook for about 2 minutes to cook off some of the tomato juices. 

Add about 1 cup chicken stock and about 1 cup heavy cream.  Reduce until it is sauce consistency.  Add the grated parmesan.  Season with salt and pepper.


When your noodles are ready, toss everything together.  You could top with more parmesan if desired.  I also think that this pasta would be good with chicken or maybe even shrimp.  It would be ideal with left-over tender roasted chicken that could be pulled off the bone (or a roasted chicken from the grocery if you're in a rush!).


Bon appetite!

Friday, October 1, 2010

Happy Birthday Henry!


Now that you're One Year Old, you're going to start calming down.... right?